


This bread is awesome. I have made it so many times I´ve lost count (Click here for my first post on this bread). I´ve substituted ingredients to suit what I had on hand, and it worked. Always. And it´s tasty. Always. It´s like all sweets and cakes and kitchen experiments are like summer romances, intense and passionate and beautiful but unreliable. And this bread resembles the best friend you had for all your life, whose shoulder you can cry on when the romance is over and your hopes are crushed. Or something like that 🙂 and now, as I promised yesterday, some tips on glutenfree baking and what I´ve experienced. (Or go straight to the recipe)
My tipps on vegan+glutenfree baking:
First off, don´t get disheartened when a recipe doesn´t work. That´s normal, and happened to me many many times. Also, you don´t have to settle for things that don´t live up to your expectations. Glutenfree baking can be just as fluffy and light as baking with gluten (there are tricks, I will come to that).
Using all-purpose flour mixes is good for the beginning, because it makes it easy to achieve consistent results.
- England: try Doves Farm, I have used them a lot, and they are really great.
- USA: a friend recommended Bobs Red Mill, but I havent used it.
- Germany: flour mixes by Schär.
- France&Spain: I have seen flour mixes by Schär, in health food shops.
I started out using them, but now I am travelling and do not have access to glutenfree flour mixes (and the ones I do find are very expensive). But thanks to the internet I found several lists for glutenfree flours. What you need to do is understand how the flours work. Basically, you can put them in three categories:
- Grains (medium)
- Starchy flours (light)
- Beany flours (heavy)
What these categories tell you is, how light or heavy the flour is. The best combination I found was
- 1/3 of a starchy flour (light) and 2/3 grain (medium)
Depending on what you want to make, you can adjust the proportions. For the beginning you will want to stick to that 1:2 ratio and then test out what works best for you. I found it´s a good idea to combine 3 or more different flours, for a mild overall taste. For example. You have rice flour, cornstarch, tapioca starch, buckwheat flour and chickpea flour. You could combine them in the following ways (all make 3 cups of flour in total):
- 1 cup cornstarch + 2 cups rice flour
- 1 cup cornstarch + 1,5 cup buckwheat flour + 0,5 cup chickpea flour
- 1 cup tapioca starch + 1 cup rice flour + 0.5 cup buckwheat flour + 0.5 chickpea flour
- 0.5 cup tapioca starch + 0.5 cup cornstarch + 1 cup rice flour + 1 cup chickpea flour
- …
Do you see the pattern? You can create endless combinations to suit your needs. Note that when you include heavier flour, the end result might be more dense, and better for bread or denser cake. You can use any kind of starch for the 1/3 starch part, and any combination of medium and heavy flours for the 2/3 grain part. Problem solving: you have just started baking and notice that you don´t have enough of a medium flour. You can try including a heavier flour in the grain part, and increase the starch part. Every combination of flours has differences in taste, consistency and how it works in baked goods. Some flours need to be used with more or less water. Some flours have a strong taste, so are better used in moderation, or in combination with other, milder, flours. You can change the ratios if you want, to suit your needs. This is the basic one I use mostly for cakes, but you can change it for making shortbread, cookies, etc… as soon as I tested them out, I will add it here. Start out with the 1/3 – 2/3 combination, and slowly change the ratio to see what it does in the recipe.
There is lots of information about this on the internet. The following lists are my favourites:
- an instruction for a wholegrain flour mix – GlutenfreeGirl
- glutenfree pancakes – RickiHeller
- Guide to GF/vegan baking – Fork&Beans
- glutenfree+vegan pancakes – The Daily Dietribe
To gum or not to gum…
Another thing I´d like to add is that many of vegan+glutenfree recipes use Xanthan or Guar gum. I have never had problems with them, but I know that some people do, so I try to bake without them as much as possible. There are other options, flaxseeds, chia seeds or psyllium husk. I always use flax, because it´s widely available, and I like the taste (and the cute little dark specks) in breads. Chia could also work, but I never tried. Sometimes I try to imitate how the traditional cake or bread is supposed to be (that requires using some kind of gum, to create the correct consistency). Sometimes I don´t and just enjoy the delicate crumb or taste (just because it´s different, doesn´t mean it´s not good 🙂 ) The bread recipe I am about to tell you does not use gums (and is very tasty, and easy enough to make).
And lastly… my personal pointers on how to make a really good cake:
- Pre-heat your oven, so that when you are done making the batter, you can put it in at the correct temperature. Glutenfree cakes can be tricky, and they are less forgiving than traditional ones.
- If baking with yeast (e.g. cinnamon rolls, or bread), make sure you read the whole recipe before, so that you can plan the rising times and you have the baked goods ready when you need them. (In general it´s a good idea to read the complete recipe before you start baking).
- Do not overmix the batter. That is very important. Mix the dry ingredients in one bowl, and the wet ingredients in a second bowl. When you combine them, stir only a few times, until it is just combined (a few small lumps are fine), then pour it into a greased baking dish and put it in the oven. As soon as the baking soda and baking powder come in contact with water, they will start reacting. You can spend as much time you like with other parts of the recipe, but as soon as you mixed the dry ingredients and the wet ingredients, put it in the oven.
- Do not open the oven before the cake is done. I know it is hard, and you want to check on it, but trust me: resist the urge and leave the oven door closed. Glutenfree cakes have tricky personalities, and just the tiniest bit of “cold” air can cause it not to rise properly. If you need to check on it, do it five minutes before it should be done, but not earlier.
- And finally: relax. It will not work all the time, and there will be failures. But these pointers eliminate the most common problems I have encountered. If anything else happens, or something doesn´t work, just ask me and I will try to help 🙂
My favourite version of the “Easy bread” (GF) – after this recipe
- 1 cup rice milk
- 1 tablespoon vinegar
- 3 tablespoons ground flaxseeds
- 2 tablespoons olive oil
- 1 3/4 cups flours*
- 1 teaspoon baking soda
- 1 teaspoon baking powder
- 1/4 teaspoon sea salt
*You can use a combination of any flours that you like. For bread you don´t need a starch, so just mix medium or heavy flours. I used 1 cup white teff, 1/2 cup buckwheat, 2 cups rice flour (that is 3.5 cups total, because I made a double batch and froze them so I would have bread for a while).
Directions:
Preheat oven to 350°F (180°C). Lightly oil a baking sheet (or baking dish). Stir together milk and vinegar. Let sit for a minute, then stir in ground flaxseed and let sit for 5 minutes. Then, stir in the oil. In a large bowl, whisk the flour, baking soda, baking powder, and salt. Make a well in the middle, pour the wet mix in and stir. It will eventually get clumpy and you’ll need to knead it until it comes together in a dough (you might have to add a bit more flour, to be able to work with it, and form it into a loaf – as I said, different flours might need more or less water). Shape it any way you like.
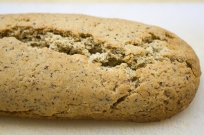


I have baked it in small rectangular baking dishes, round, or in the shape of a french bread. Place on baking sheet and brush liberally with extra oil. Bake for 40 minutes. Allow to rest at least 20 minutes before cutting.
_______________________________
Dieses Brot ist toll. Ich weiß nicht mehr, wie oft ich es schon gemacht habe. (Klick hier für meinen ersten Post über dieses Brot). Ich habe Zutaten ausgetauscht, und es mit dem gemacht, was ich da hatte, und es funktionierte. Immer. Und es schmeckt. Immer. Es ist, als wären alle Süßigkeiten und Kuchen und Küchenexperimente wie Sommerromanzen, intensiv, leidenschaftlich, wunderschön aber unzuverlässig. Und dieses Brot ist dann wie der beste Kumpel, den man schon ewig kennt, und an dessen Schulter man sich dann ausheulen kann wenn die Romanze vorbei ist und alle Hoffnungen dahin sind… oder sowas in der Richtung 🙂 und jetzt, wie ich gestern angekündigt habe, meine Tips zu veganem-glutenfreiem Backen und meine Erfahrungen. (oder hier gehts direkt zum Rezept)
Meine Tipps zu veganem+glutenfreiem Backen:
Zuallererst, lass dich nicht entmutigen, wenn ein Rezept nicht klappt. Das ist normal, und ist mir schon sehr oft passiert. Und du musst dich auch nicht mit etwas abfinden, wenn es nicht deinen Vorstellungen entspricht. Glutenfreies Backen kann genauso fluffig und luftig sein wie Backen mit Gluten (da gibt es Tricks, dazu komme ich noch)
Entwickle ein Gefühl für Mehle und Verhältnisse/Kombinationen. Glutenfreie Allzweck-Mehlmischungen machen es leicht für den Anfang, weil man mit ihnen gleichmäßig gute Ergebnisse erzielt.
- England: Doves Farm, welche richtig gut sind.
- USA: Bobs Red Mill, was mir eine Freundin empfohlen hat.
- Deutschland: Schär, die habe ich aber noch nie benutzt.
- Frankreich&Spanien: ich habe Mehlmischungen von Schär in Läden gesehen.
Zu Beginn habe ich sie gerne verwendet, aber da ich gerade reise, finde ich kaum glutenfreie Mehlmischungen (und die, die ich finde, sind sehr teuer). Aber dank des Internets habe ich einige gute Listen gefunden. Dazu muss man verstehen, wie die Mehle funktionieren. Im Grunde kann man sie in drei Kategorien einordnen:
- Getreide (medium)
- Stärkemehle (leicht)
- Bohnen (schwer)
Diese Kategorien zeigen, wie “schwer” die Mehle sind. Die beste Kombination, die ich meist benutze, ist
- 1/3 Stärke (leicht) und 2/3 Getreide (medium)
Je nachdem, was du backen willst, kannst du es anpassen. Fange mit dem 1:2 Verhältnis an und probiere dann aus, was für dich am Besten ist. Ich nehme meist 3 oder mehr verschiedene Mehle, um einem milden Gesamtgeschmack zu erzielen. Ein Beispiel: du hast Reismehl, Maisstärke, Tapiokastärke, Buchweizenmehl und Kichererbsenmehl. Folgende Kombinationen sind möglich (für 3 cups Mehl ingesamt)
- 1 cup Maisstärke + 2 cups Reismehl
- 1 cup Maisstärke + 1,5 cup Buchweizenmehl + 0,5 cup Kichererbsenmehl
- 1 cup Tapiokastärke + 1 cup rice Reismehl + 0.5 cup Buchweizenmehl + 0.5 Kichererbsenmehl
- 0.5 cup Tapiokastärke + 0.5 cup Maisstärke + 1 cup Reismehl + 1 cup Kichererbsenmehl
- …
Erkennt ihr das Muster? Man kann endlose Kombinationen erstellen, ganz nach eigenen Bedürfnissen. Wenn ihr ein schweres Mehl verwendet, ist das Ergebnis meist etwas kompakter, und besser für Brot (oder schwerere Kuchen) geeignet. Du kannst jede Stärke für den 1/3 Stärke-Anteil verwenden, und jede Kombination von medium oder schweren Mehlen für den 2/3 Getreide-Anteil. Z.b. du hast grade angefangen zu backen, aber du hast nicht genug medium Mehl. Dann kannst du ein schweres Mehl zum Getreideanteil hinzufügen, und den Stärkeanteil etwas erhöhen. Jede Kombination ist anders in Geschmack, Konsistenz und Verhalten beim Backen. Manche Mehle brauchen mehr oder weniger Flüssigkeit im Rezept. Manche haben einen starken Eigengeschmack und sind besser in kleineren Mengen oder in Kombination mit anderen, milden, Mehlen. Ihr könnt gerne mit den Verhältnis experimentieren, je nach Bedarf. Dieses Verhältnis nehme ich meist für Kuchen, aber ihr könnt es anpassen, für andere Gebäcke, Kekse, etc… sobald ich diese ausprobiert habe, füge ich es hier hinzu. Fangt mit dem 1/3 zu 2/3 Verhältnis an, und verändert es in kleinen Schritten, um zu sehen, wie es im Rezept funktioniert.
Es gibt viel Information darüber im Internet. Die folgenden Listen sind meine Favoriten:
- eine Anleitung für einen Vollkorn-Mehl-Mix – GlutenfreeGirl (englisch)
- glutenfreie Eierkuchen – RickiHeller (englisch)
- Anleitung zum glutenfreien/veganen Backen – Fork&Beans (englisch)
- glutenfreie+vegane Eierkuchen – TheDailyDietribe (englisch)
- vegane+glutenfreie Hefeteige – kochtrotz (deutsch)
- Mehlmischungen – PuresGenießen (deutsch)
Bindemittel oder nicht Bindemittel, das ist hier die Frage…
Viele vegane+glutenfreie Backrezepte verwenden Xanthan oder Guar. Ich habe damit kein Problem, aber ich weiß, dass manche sie nicht vertragen, also versuche ich, sie weitestgehend zu meiden. Es gibt andere Optionen: Leinsamen, Chiasamen oder Flohsamenschalen. Ich nehme immer Leinsamen, weil man sie überall kaufen kann und ich den Geschmack mag (und auch die kleinen dunklen Pünktchen) in Broten. Chia funktioniert wohl auch, habe ich aber noch nie ausprobiert. Manchmal möchte ich imitieren, wie das Brot oder Kuchen traditionell ist (dazu braucht man ein Bindemittel wie Xanthan, um die richtige Konsistenz zu erreichen). Manchmal ist mir das egal, und ich genieße einfach das Brot oder den Kuchen, (denn nur weil es anders ist, heißt das nicht, dass es nicht lecker ist 🙂 ) Das Brotrezept in diesem Post verwendet kein Xanthan (und es ist so lecker, und einfach zu machen)
Und zuletzt… meine persönlichen Tipps, wie man einen richtig guten Kuchen macht:
- Heize den Ofen vor, sodass, wenn der Teig fertig ist, er zur richtigen Temperatur in den Ofen kommt. Glutenfreie Kuchen können zickig sein, und erfordern mehr Aufmerksamkeit als normale Kuchen.
- Wenn du Hefe verwendest (z.B. für Zimtschnecken oder Brot), lies dir das Rezept vorher komplett durch, damit du die Gehzeiten einplanen kannst, und es fertig ist, wenn es fertig sein soll. (es ist generell eine gute Idee, das Rezept durchzulesen, bevor du mit den Backen anfängst)
- Rühre den Teig nicht zu sehr. Das ist sehr wichtig. Vermische die trockenen Zutaten in einer Schüssel und die nassen Zutaten in einer zweiten Schüssel, bis es gerade vermischt ist (ein paar kleine Klümpchen sind ok), dann gieß den Teig in die eingefettete Backform und tue diese in den Ofen. Sobald das Back-Natron mit Wasser in Berührung kommt, wird es anfangen, zu reagieren. Mit dem Rest des Rezepts kannst du dir Zeit lassen, aber sobald du die trockenen und nassen Zutaten vermischt hast, muss es sofort gebacken werden.
- Öffne nicht den Ofen, bevor der Kuchen fertiggebacken ist. Ich weiß, es ist nicht einfach, aber vertraue mir: widerstehe dem Drang, und lass die Ofentür geschlossen. Glutenfreie Kuchen habe ihre Macken, und der kleinste kalte Windhauch kann zur Folge haben, dass sie nicht richtig aufgehen. Wenn du unbedingt nachschauen willst, dann 5 Minuten bevor er fertiggebacken ist, aber nicht eher.
- Und schlussendlich: entspanne dich. Es wird nicht immer klappen, es wird Misserfolge geben. Aber diese Tipps helfen bei den den üblichen Problem, die mir passierten. Wenn etwas Anderes nicht klappt, fragt mich und ich werde versuchen, zu helfen 🙂
Meine Lieblingsversion des “Einfachen Brots” (GF) – nach diesem Rezept
- 1 cup Reismilch
- 1 EL Essig
- 3 EL gemahlene Leinsamen
- 2 EL Olivenöl
- 1 3/4 cups Mehl*
- 1 TL Backpulver
- 1 TL Natron
- 1/4 TL Salz
* Du kannst alle Mehle kombinieren, die du magst. Für Brot braucht man keine Stärke, also verwende eine Mischung von medium und schweren Mehlen. Ich habe 1 cup weißes Teffmehl, 1/2 cup Buchweizenmehl und 2 cups Reismehl genommen (das sind 3,5 cups insgesamt, weil ich das Rezept verdoppelt hab, und dann ein paar Brote eingefroren hab, um es für eine Weile dazuhaben)
Anleitung:
Ofen auf 350°F (180°C) vorheizen. Fette ein mit Backpapier belegtes Backblech (oder eine Brotform) ein. Verrühre Reismilch und Essig, und lass es für eine Minute stehen. Füge die Leinsamen hinzu, verrühre alles und lass es für 5 Minuten stehen. Dann gib das Öl hinzu. Vermische in einer großen Schüssel Mehl, Backpulver, Natron und Salz. Mache eine Kuhle in der Mitte, gieße die feuchten Zutaten hinein und verrühre alles. Irgendwann klumpt es zusammen, und dann knete es, bis es einen Teig ergibt (evtl. musst du etwas Mehl hinzugeben, um es zu verarbeiten und zu einem Brot zu formen – wie gesagt, verschiedene Mehle können mehr oder weniger Flüssigkeit benötigen). Forme es, wie du magst.
Ich habe es in kleinen rechteckigen Backformen, rund, und in der Form eines Baguettes gemacht. Lege es auf das Backblech und bestreiche es mit Öl. Backe es für 40 min. Lass es mindestens 20 min abkühlen, bevor du es in Scheiben schneidest.

This is such great information–and that bread looks FANTASTIC!! I am thrilled to see that there is no yeast in it, either–just my kinda bread!! And thanks so much for linking to my pancake post. 🙂 (Just so people aren’t surprised–the blog has changed name and isn’t Diet, Dessert and Dogs anymore, though. Sniff. But the dogs are still prominently there!!). 😀
yeah I just saw today that you had moved. I love your blog^^ thanks for stopping by 🙂
A great round up. I’ve made gluten free breads and cakes for a while but did it by intuition and never thought of the ratio. Love this. Thanks for simplifying it all. Your bread looks gorgeous. Love the look of the crust.
thank you 🙂 It´s nice when it works through intuition. But when I started baking glutenfree, I didnt know what to combine, and had lots of failures. These are the baking tips that I would´ve liked in the beginning^^ and that would´ve saved a lot of trial and error.
Wow, such a helpful post! Thanks!
cheers 🙂